

 Posts
Posts


Want it by Christmas? I need to have your order in by the following dates:
November 11 Last day to order a Matchless
November 18 Last day to order a Ladybug, Floor Loom or Wolf Loom
November 30 Last day to order Accessories and Small Looms
ALL Schacht Looms and spinning wheels (including Matchless) are 10% off retail prices if ordered this month. Let me know!
Friday, November 5, 2010


Thursday, November 4, 2010
Open House on Saturday, Nov. 6th.

If you are in the area on Saturday, stop by for my Fall Fiber Open House! Wool, wool, WOOL! Wheels, looms, and a fire in the fireplace. I'll be open from 1-6 pm. Email me for directions!
Monday, November 1, 2010
A Tiny Adventure in Ikat.
One of the things we used to see along the mountain roads in Guatemala was long lengths of warp threads drying in the sun, held up off the ground on forked sticks. The warps were cotton and had been tie-dyed and then dyed indigo or black. In Guatemala this technique is called jaspe. In the world of weaving it is also called Ikat, which is Japanese.
I decided to try a little ikat at home. I measured out a couple of yards of silk warp and then tied it up and down.

Then I dyed it dark green. When I took off the ties there were little white areas.
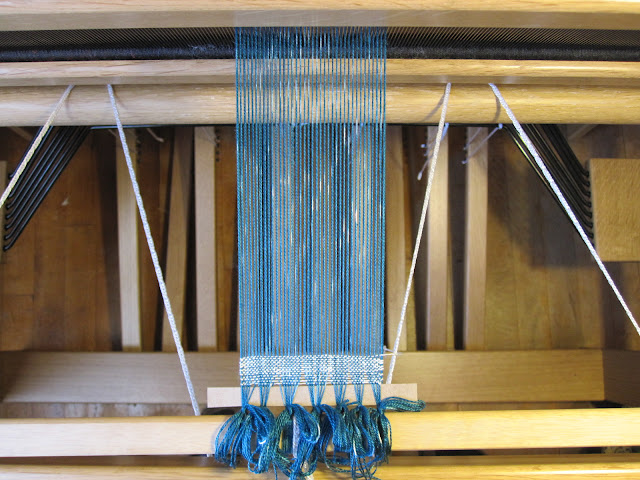
Here is how it looked on the loom.
Here is how it looked woven.

There was only one really big surprise here. I wove the silk at 24 epi and it was so tight the resulting cloth felt like cardboard, or at best, upholstery fabric and was barely shiny at all. The little white streaks were interesting but I realized I'd have to go back to the drawing board and experiment more with the sett before designing a complete project.
Once again, I am GLAD I made a sample!
I decided to try a little ikat at home. I measured out a couple of yards of silk warp and then tied it up and down.

Then I dyed it dark green. When I took off the ties there were little white areas.
Here is how it looked on the loom.

Here is how it looked woven.

There was only one really big surprise here. I wove the silk at 24 epi and it was so tight the resulting cloth felt like cardboard, or at best, upholstery fabric and was barely shiny at all. The little white streaks were interesting but I realized I'd have to go back to the drawing board and experiment more with the sett before designing a complete project.
Once again, I am GLAD I made a sample!
Monday, October 18, 2010
Gamp and More Gamp - And What I Learned This Time
Last May I bought a weaving kit from Halcyon Yarn but when it arrived I realized it was far too advanced for my skills at that time. I got it out two weeks ago and decided I was ready.
The kit used 10/2 Perle Cotton at 36 ends per inch in a Huck Lace (also called Huckabuck or Huckaback) pattern. Once I got the loom warped the weaving was pretty fast. I finished sewing the hems on the six place mats last night.

Here is what I learned. I would probably not make placemats from perle cotton again. It is too soft. I expect place mats to be a bit stiff and sturdy. These are soft enough to be napkins. If I'd known that from the beginning, I would have made napkins instead! I ended up pressing them with spray starch.
Huck Lace draws in A LOT. I spent a bit of time trying to iron the placemats into rectangles. You can see how they flare a bit at the ends where there is an inch of plain weave. If I made them again I would not add that inch at the ends.
I don't like black edges with colored weft. It seems to show every tiny flaw. The pattern called for an inch of tabby on either edge. If I did them again I would reduce this to half an inch.
With such a dense warp (36 epi) it was IMPOSSIBLE to get an even weft, no matter how hard I muscled the beater. 36 warp ends equaled an inch - half that many weft shots equaled an inch in pattern, and in tabby it was even less, more like 12-14!
The hems of each place mat were woven using plain sewing thread for weft. This made a smooth, warp-faced BEAUTIFUL shiny fabric! The color of the thread hardly showed at all. In fact, tightly packed 10/2 warp with sewing thread weft would make fantastic striped napkins. They'd have a great sheen, be smooth, and the stripes would be solid. The spool of thread fit right into a small boat shuttle so it was easy to weave.
I liked the huck lace pattern and will probably make something with all my leftovers. I will expect it to be soft, cushy, and draw in...a lot! I will not repeat the elements I didn't like but will do it my OWN way next time.

As always, I learned a lot!
The kit used 10/2 Perle Cotton at 36 ends per inch in a Huck Lace (also called Huckabuck or Huckaback) pattern. Once I got the loom warped the weaving was pretty fast. I finished sewing the hems on the six place mats last night.

Here is what I learned. I would probably not make placemats from perle cotton again. It is too soft. I expect place mats to be a bit stiff and sturdy. These are soft enough to be napkins. If I'd known that from the beginning, I would have made napkins instead! I ended up pressing them with spray starch.
Huck Lace draws in A LOT. I spent a bit of time trying to iron the placemats into rectangles. You can see how they flare a bit at the ends where there is an inch of plain weave. If I made them again I would not add that inch at the ends.
I don't like black edges with colored weft. It seems to show every tiny flaw. The pattern called for an inch of tabby on either edge. If I did them again I would reduce this to half an inch.
With such a dense warp (36 epi) it was IMPOSSIBLE to get an even weft, no matter how hard I muscled the beater. 36 warp ends equaled an inch - half that many weft shots equaled an inch in pattern, and in tabby it was even less, more like 12-14!
The hems of each place mat were woven using plain sewing thread for weft. This made a smooth, warp-faced BEAUTIFUL shiny fabric! The color of the thread hardly showed at all. In fact, tightly packed 10/2 warp with sewing thread weft would make fantastic striped napkins. They'd have a great sheen, be smooth, and the stripes would be solid. The spool of thread fit right into a small boat shuttle so it was easy to weave.
I liked the huck lace pattern and will probably make something with all my leftovers. I will expect it to be soft, cushy, and draw in...a lot! I will not repeat the elements I didn't like but will do it my OWN way next time.

As always, I learned a lot!
Friday, October 1, 2010
Spun It, Dyed It, Wove It, Sewed It!
I finished Marty's vest yesterday and he wore it to work today. It looks fabulous on him!

Sewing with my handspun was a fun challenge. (Here is a link to my post about spinning and weaving the fabric.) First I had to CUT OUT THE PIECES. The first snip felt positively sinful but after that it was fun. The fabric pattern is the same on front and back and so I was able to fit all the pattern pieces on, one layer at a time, without regard to any of that. It is a good thing my husband is skinny. I wove this on an 18" wide loom - any larger and the pieces would not have fit.

Because the fabric is somewhat coarse I had to handle it as little as possible because it ended to fray at the raw edges. Fortunately the pattern didn't call for any overturned or hemmed edges - the whole thing was lined. The fabric would not have been stable enough for an unlined garment - I think it would have stretched out of shape.

I lined the vest with rayon lining. The welt pockets were also lined with rayon. I reinforced the buttonholes with a strip of iron-on interfacing on the back side of the fabric and sewed them on the machine. Mom would have made hand-bound buttonholes, I hope she was not looking down at me from that sewing room in the sky!

Sewing with my handspun was a fun challenge. (Here is a link to my post about spinning and weaving the fabric.) First I had to CUT OUT THE PIECES. The first snip felt positively sinful but after that it was fun. The fabric pattern is the same on front and back and so I was able to fit all the pattern pieces on, one layer at a time, without regard to any of that. It is a good thing my husband is skinny. I wove this on an 18" wide loom - any larger and the pieces would not have fit.

Because the fabric is somewhat coarse I had to handle it as little as possible because it ended to fray at the raw edges. Fortunately the pattern didn't call for any overturned or hemmed edges - the whole thing was lined. The fabric would not have been stable enough for an unlined garment - I think it would have stretched out of shape.

I lined the vest with rayon lining. The welt pockets were also lined with rayon. I reinforced the buttonholes with a strip of iron-on interfacing on the back side of the fabric and sewed them on the machine. Mom would have made hand-bound buttonholes, I hope she was not looking down at me from that sewing room in the sky!
Tuesday, September 28, 2010
How To Buy Hand-Dyed Wool

My first attempts at fiber dyeing were less than stellar. I had two big problems. First, I didn't know much about the chemistry of dye/wool/heat/acid. Second, I wasn't an experienced enough spinner to know a disaster when I saw one.
The piece of roving on the left is some Sweet Grass Targhee combed top that I ruined in an attempt to make painted roving. HOWEVER, I didn't know it was ruined and spun from it anyway. My arms literally ached from pre-drafting and spinning was a nightmare. I chalked it up to being a beginner trying to spin wool that was finer than Romney. The problem was neither. The problem was FELTING.
The fiber on the right is also hand-dyed but now I know what I'm doing. It is as easy to draft as undyed top. It is soft, fluffy, and has no felting at all. This is the only kind I sell to other people.
I have attended a regional fiber festival for the last three years and have seen yards and yards of FELTED FIBER BRAIDS for sale. The braids are gorgeous. The colors are stunning. But an experienced spinner walks right by. It is only the poor beginners who get sucked into buying felted roving.
When you are examining a braid of hand-dyed roving/top, CHECK THE ENDS. They should be fluffy and the fibers should fan out if you give it a shake. If there are no ends exposed, ask to undo one and take a look at it. Feel it. Pull a few fibers. They should slide right out.
All braided top gets a bit compacted in storage - that isn't a problem. The ends will tell all. If the ends are good chances are the rest is good and all it will need to be ready for spinning is a tug or two and a good, hard shake.
If you are buying online be sure that the vendor offers a full refund, no questions asked. If they dyer is not a very experienced spinner, she may think the roving is perfect but you may think otherwise. Ask her how long she has been spinning and dyeing and be especially wary of extra fine fibers like merino, which is super hard to dye without felting at least a bit.
Finally, a properly dyed braid of roving should be fat and fluffy and soft. It should not look or feel like felt! If it does, walk away! Or prepare yourself for a serious workout at the spinning wheel.
Friday, September 24, 2010
More Overdyed Gray Wool...
I was so inspired by how the blue yarn turned out that I dug all my blah gray handspun out of the closet and dyed it. You can see the results in my new blog photo! Whew! Now I actually feel like using this yarn.
I'm thinking of a weaving project!
I'm thinking of a weaving project!
Tuesday, September 21, 2010
Overdyeing: Blah Wool Gets a Face Lift
Yesterday I skeined off 2000 yds of gray Romney/Mohair two ply yarn and thought, "Blech. This gray does nothing for me." The roving was scrumptious - top quality from Peeper Hollow Farm - but the yarn did nothing for me. I had spent weeks making this yarn and I wasn't about to give up on it. Dye to the rescue!
I decided on blue so I did color samples from my four favorite colors of blue dye. Color sampling is easy in the microwave oven. Here's how I did it.
I took four little bits of gray roving and put them in water plus a drop of dish detergent to soak while I got everything else ready. Then I found four quart canning jars and put labels on each one - sky blue, brilliant blue, royal blue, navy. I added one teaspoon of liquid dye, one teaspoon of vinegar, and a cup of water to each jar. Now I had 4 little dyebaths ready to go.
Each bit of fiber went into its own jar of dye. I then put all four jars in the microwave oven and brought the dye to a boil - about 4 minutes. I then set the microwave to half power, and six minutes, and let it cook. By the time the dinger went off, each dyebath was exhausted and the fiber was dyed.
I fished out the blobs of dyed fiber with a fork (too hot for fingers) and pressed them between thick layers of paper towels to get most of the water out. This is what I ended up with. From left to right the colors are, royal blue, sky blue, navy, and brilliant blue.

My favorite was somewhere between the sky blue and royal blue, so I got all my big skeins wetted down and prepared the dyebath. I had two pounds of fiber. I put in enough sky blue dye for one pound (that's all I had) and added enough Royal blue for four ounces. I filled the canner and added the ten skeins of yarn. My hope was to get a medium denim blue, also known as "Scandinavian Blue". And this is what I got! You can see the original gray fiber and yarn sample in contrast to overdyed yarn.

The luster of the Romney and Mohair is very evident in the finished yarn. It has a depth that dyed white wool could never have, as the darker fibers are still darker in the final yarn. I don't think "blech" when I look at my new yarn - Now I love it. All the work was worth it. And the dyepot saved the day, again.
I decided on blue so I did color samples from my four favorite colors of blue dye. Color sampling is easy in the microwave oven. Here's how I did it.
I took four little bits of gray roving and put them in water plus a drop of dish detergent to soak while I got everything else ready. Then I found four quart canning jars and put labels on each one - sky blue, brilliant blue, royal blue, navy. I added one teaspoon of liquid dye, one teaspoon of vinegar, and a cup of water to each jar. Now I had 4 little dyebaths ready to go.
Each bit of fiber went into its own jar of dye. I then put all four jars in the microwave oven and brought the dye to a boil - about 4 minutes. I then set the microwave to half power, and six minutes, and let it cook. By the time the dinger went off, each dyebath was exhausted and the fiber was dyed.
I fished out the blobs of dyed fiber with a fork (too hot for fingers) and pressed them between thick layers of paper towels to get most of the water out. This is what I ended up with. From left to right the colors are, royal blue, sky blue, navy, and brilliant blue.

My favorite was somewhere between the sky blue and royal blue, so I got all my big skeins wetted down and prepared the dyebath. I had two pounds of fiber. I put in enough sky blue dye for one pound (that's all I had) and added enough Royal blue for four ounces. I filled the canner and added the ten skeins of yarn. My hope was to get a medium denim blue, also known as "Scandinavian Blue". And this is what I got! You can see the original gray fiber and yarn sample in contrast to overdyed yarn.

The luster of the Romney and Mohair is very evident in the finished yarn. It has a depth that dyed white wool could never have, as the darker fibers are still darker in the final yarn. I don't think "blech" when I look at my new yarn - Now I love it. All the work was worth it. And the dyepot saved the day, again.
Tuesday, June 29, 2010
Greensleeves Spindles: The Wooden Rainbow

One of the most addicting things about spinning is hand-made drop spindles. Most of us start out with something kind of clunky and mass-produced. We wonder why people love spinning. We make rope. We drop the dang thing a million times. Then we start to get the hang of it, and pretty soon we need another spindle! We don't want another Clunker...so we start looking for The Spindle.
We buy something really special and think we're fixed for a life of spinning. But no, we need a lace spindle. And a one ounce. And a one and a half ounce. And a Bloodwood...
I've been selling Greensleeves Spindles for just under a year and have been thrilled witht he quality and beauty of these spindles. Each Greensleeves drop spindle is made by hand by Elizabeth and Bart Daily of Provo, UT. They are carefully turned, balanced, tested. When I get a box of spindles it is like Christmas! I never tell Elizabeth what to make me, other than a size range and how many I am ordering, so it is always the most fabulous surprise. WOODEN RAINBOW!
Here is the bouquet that came in the mail today. They are listed at my Etsy store and I expect them to sell out fairly quickly. I am always tempted to keep a few...
There is only one thing wrong with Greensleeves Spindles. They sell out almost immediately and then I have to wait WEEKS for the next batch!
Sunday, June 20, 2010
Gamp Camp: Weaving With Color
I'm working on spinning my second batch of warp for a weaving project. Just couldn't bring myself to mix commercial yarn with my handspun....so here we come, rabbit skin glue! It takes me a while to spin enough yards, so I thought I'd better have something going on the loom at the same time. Practice makes perfect and I have a LOT of skill-building to do.
I bought a gamp kit from Yarn Barn of Kansas. What is a gamp? British slang for an umbrella...oh yeah, and it's a weaving thing too. Here's the definition. A gamp is a systematic arrangement of warp threadings or warp color sequences in section of equal size, each section being a minimum of two inches and not more than six, and woven as drawn in. Thank you, Harriet Tidball of Handwoven Magazine!
The warp was supposed to be 36 inches wide in a 12 dent reed, and the stripes were 24 ends wide (2 inches), but my big loom is European, metric, and the reed is just under 36 inches, so I had to pull one end from each of the last four colors. The reed was FULL! Warping took me two days.

Weaving only took about four hours. I had to stop and change the bobbin in the shuttle every 24 picks, which took up a lot of time as well. There were 18 colors. If I'd had 18 shuttles, it would have been a lot faster! But I only have two.
The wool was somewhat stiff and rough but after washing it fluffed up (bloomed) and softened a lot. I am happy with the outcome, and so is the recipient of the blanket. Happy Father's Day, Marty!

And then, of course there were leftovers, which I didn't want to throw out, so...they are being transformed into a random-color, 2x2 twill plaid scarf on the Wolf Pup LT.

What I learned: I was surprised by which color combinations seemed attractive to me and which did not. For instance, I liked olive green over maroon, and rust over bright green, but didn't like any of the squares that intersected with white. Black plus color looked good no matter what color, but showed any flaws in weaving. Gray over any color cut the brightness in half. I found myself LOVING the green and blue blocks, and feeling somewhat indifferent about the yellow/orange/rust. It definitely gave me some great ideas for using color in future projects and I will be able to take a look at it whenever I wonder how specific colors will interact in a plain weave cloth.
This was a kit so I couldn't veer much from the plan, but in the future I will probably try to make at least two blankets from the same warp. It takes a long time to set up - might as well get my money's worth from the process. Finally, I was amazed at how quickly the actual weaving went. Whew. After years and years of knitting, the almost instant gratification makes me dizzy.
I bought a gamp kit from Yarn Barn of Kansas. What is a gamp? British slang for an umbrella...oh yeah, and it's a weaving thing too. Here's the definition. A gamp is a systematic arrangement of warp threadings or warp color sequences in section of equal size, each section being a minimum of two inches and not more than six, and woven as drawn in. Thank you, Harriet Tidball of Handwoven Magazine!
The warp was supposed to be 36 inches wide in a 12 dent reed, and the stripes were 24 ends wide (2 inches), but my big loom is European, metric, and the reed is just under 36 inches, so I had to pull one end from each of the last four colors. The reed was FULL! Warping took me two days.

Weaving only took about four hours. I had to stop and change the bobbin in the shuttle every 24 picks, which took up a lot of time as well. There were 18 colors. If I'd had 18 shuttles, it would have been a lot faster! But I only have two.
The wool was somewhat stiff and rough but after washing it fluffed up (bloomed) and softened a lot. I am happy with the outcome, and so is the recipient of the blanket. Happy Father's Day, Marty!

And then, of course there were leftovers, which I didn't want to throw out, so...they are being transformed into a random-color, 2x2 twill plaid scarf on the Wolf Pup LT.

What I learned: I was surprised by which color combinations seemed attractive to me and which did not. For instance, I liked olive green over maroon, and rust over bright green, but didn't like any of the squares that intersected with white. Black plus color looked good no matter what color, but showed any flaws in weaving. Gray over any color cut the brightness in half. I found myself LOVING the green and blue blocks, and feeling somewhat indifferent about the yellow/orange/rust. It definitely gave me some great ideas for using color in future projects and I will be able to take a look at it whenever I wonder how specific colors will interact in a plain weave cloth.
This was a kit so I couldn't veer much from the plan, but in the future I will probably try to make at least two blankets from the same warp. It takes a long time to set up - might as well get my money's worth from the process. Finally, I was amazed at how quickly the actual weaving went. Whew. After years and years of knitting, the almost instant gratification makes me dizzy.
Thursday, June 17, 2010
Bartlettyarns - For Sale at my Etsy Store
I am now a Bartlettyarns dealer and have ten cones of this great yarn for sale at my Etsy store. Cones have 1750 yds (1 pound) of woolen-spun sport weight yarn, great for knitting, weaving, crochet, felting, or any other fiberart project.
This yarn knits at 5-6 sts/inch on size 3-5 needles. Weaving setts are 10-15.
Here are a few things you can do with this great yarn-on-a-cone: weave, knit, crochet, use as warp only with handspun weft. Yarn on a cone is great for spinning art yarns - use it as the core and add in fluff, locks, or other fiber. Spin in the direction of the yarn's ply twist.
Coned yarn hasn't been finished - after weaving or knitting the item should be gently washed in warm water. It will bloom and soften up a great deal.
Bartlettyarns, Inc is a working museum woolen mill located in Harmony, Maine. Yarn is made in the same way, with the same equipment used in the early 1800s. It is woolen-spun from big batts (you can see them on the rolls in the video) and most of the yarns are dyed in the wool, then spun, to create heather blends. Colors are not all available at all times - they are spun one run at a time as wool becomes available. All wool comes from US wool growers.
This yarn knits at 5-6 sts/inch on size 3-5 needles. Weaving setts are 10-15.
Here are a few things you can do with this great yarn-on-a-cone: weave, knit, crochet, use as warp only with handspun weft. Yarn on a cone is great for spinning art yarns - use it as the core and add in fluff, locks, or other fiber. Spin in the direction of the yarn's ply twist.
Coned yarn hasn't been finished - after weaving or knitting the item should be gently washed in warm water. It will bloom and soften up a great deal.
Bartlettyarns, Inc is a working museum woolen mill located in Harmony, Maine. Yarn is made in the same way, with the same equipment used in the early 1800s. It is woolen-spun from big batts (you can see them on the rolls in the video) and most of the yarns are dyed in the wool, then spun, to create heather blends. Colors are not all available at all times - they are spun one run at a time as wool becomes available. All wool comes from US wool growers.
Thursday, June 10, 2010
Weaving with Handspun: First Big Project
I started this project by spinning a lot of yarn. Two-ply for the warp (1700 yds of Romney) and single ply for the weft (3200 yds of Romney lamb/alpaca). I got these numbers from my calculations of what it would take to make 5.5 yds of cloth, 18 inches wide, at a sett of 15 e.p.i. (Ends, or warp threads per inch.)

Next I dyed the yarn and sized it with rabbit skin glue.
Wound the stiff, sized yarn into many balls.
Warped the Schacht Wolf Pup LT loom for sampling.

Samples. I thought I'd weave the cloth in a houndstooth twill but I didn't like how the sample turned out (top sample). My weft yarn was a single ply and there were slight variations in thickness - the variations didn't work well in herringbone. So, I tried other combinations until I found one I liked. I had to cut off the sample, re-thread the heddles and re-sley the reed and tie the new warp onto the cloth beam.


Once I was sure of what I wanted I warped the loom and started to weave. I broke six warp ends during weaving and repaired each one according to the instructions in LEARNING TO WEAVE. For my next big handspun weaving project I'm going to use commercial yarn in the warp - I spent a lot of time worrying about fraying and breakage. I also spent a lot of time spraying starch on the warp to make it even stiffer. I don't know if it helped or not.

One week later...

Before washing my fabric measured 5.5 yds by 17 inches wide. It is soft with a nice hand and the perfect weight for a tailored wool vest. I soaked the fabric in hot water with Woolite, swished it a little, and rinsed. I laid it out flat to dry and can't wait to cut into it!
Here are my thoughts on my first big weaving project. I'll do it again, and soon. I'll use commercial warp next time and I'll double the ends at the edges because those seemed to break the most easily. I overestimated how much warp yarn I'd need and underestimated on the warp. I AM GLAD I SAMPLED. For a diehard non-swatcher, this is big.
I feel like Pioneer Woman!!! And it all started with a little Cricket Loom...

Next I dyed the yarn and sized it with rabbit skin glue.
Wound the stiff, sized yarn into many balls.
Warped the Schacht Wolf Pup LT loom for sampling.

Samples. I thought I'd weave the cloth in a houndstooth twill but I didn't like how the sample turned out (top sample). My weft yarn was a single ply and there were slight variations in thickness - the variations didn't work well in herringbone. So, I tried other combinations until I found one I liked. I had to cut off the sample, re-thread the heddles and re-sley the reed and tie the new warp onto the cloth beam.


Once I was sure of what I wanted I warped the loom and started to weave. I broke six warp ends during weaving and repaired each one according to the instructions in LEARNING TO WEAVE. For my next big handspun weaving project I'm going to use commercial yarn in the warp - I spent a lot of time worrying about fraying and breakage. I also spent a lot of time spraying starch on the warp to make it even stiffer. I don't know if it helped or not.

One week later...

Before washing my fabric measured 5.5 yds by 17 inches wide. It is soft with a nice hand and the perfect weight for a tailored wool vest. I soaked the fabric in hot water with Woolite, swished it a little, and rinsed. I laid it out flat to dry and can't wait to cut into it!
Here are my thoughts on my first big weaving project. I'll do it again, and soon. I'll use commercial warp next time and I'll double the ends at the edges because those seemed to break the most easily. I overestimated how much warp yarn I'd need and underestimated on the warp. I AM GLAD I SAMPLED. For a diehard non-swatcher, this is big.
I feel like Pioneer Woman!!! And it all started with a little Cricket Loom...
Subscribe to:
Posts (Atom)
